The Data Import Wizard is an incredibly powerful out-of-the-box tool that allows users to easily import data, up to 50000 records using CSV files as a source, into their Salesforce org. This tool can save time and effort, eliminating the need to enter data into Salesforce when manually dealing with large data sets.
In this article, we’ll look at the Data Import Wizard’s features, how it works, and how it can improve data efficiency and accuracy when importing data into Salesforce. We will also go over how firms may end up making use of Salesforce Data Import Wizard.
Overview of the Data Import Wizard
The Import Wizard is a great way to quickly and easily import data using a CSV file. The Data Import Wizard allows users to map the data fields from the uploaded file to the corresponding fields in Salesforce. This ensures that the data is imported accurately.
Import Wizard supports insert, update, and upsert operations. Insert allows you to add new data to Salesforce. The update allows you to modify existing data in Salesforce with data from your uploaded file, and upsert allows you to either create a new record or update an existing record.
Features of Data Import Wizard in Salesforce
Showcased here are some of the most notable aspects of Salesforce’s Data Import Wizard that make it useful.
1. Automated Data Mapping
Salesforce’s Data Import Wizard has an automatic data mapping function that allows you to map data from CSV files to Salesforce fields. This offers smooth data mapping while minimizing time and effort.
2. Data Validation
Salesforce’s Data Import Wizard supports the standard data validation implemented in the org. This prevents incorrect data from being imported into Salesforce, which could cause problems down the line.
3. Bulk Data Import
Salesforce’s Data Import Wizard also supports bulk data import. It supports up to 50000 records. This is an excellent functionality for businesses that need to import a large volume of data into Salesforce.
How Does the Data Import Wizard Works?
Importing data has always been challenging with the intuitive and user-friendly Import Wizard. With just a few clicks, you can import data quickly and efficiently, saving time and effort. Let the Import Wizard simplify your data-importing process.
Users first select the standard or custom object they wish to import to use the Data Import Wizard. Then the user selects the operation like insert, update, or upsert and finally uploads the file. Once the file is uploaded, users map the data fields from the uploaded file to the corresponding fields in Salesforce.
After mapping the fields, users can preview the data before it is imported into Salesforce. This allows users to avoid any potential data loss or corruption.
Once users are satisfied with the data preview, they can import it into Salesforce.
Parameters for Data Import Wizard
The Data Import Wizard is an excellent tool for importing data into Salesforce, but there are some things to remember before getting started. Here are some key considerations:
- File Capacity in Terms of the Total Number of Records: The Data Import Wizard supports up to 50,000 records.
- File Size: The Data Import Wizard limits 100 MB and 32 MB zip files.
- Objects Supported:
- Not supported standard objects include:
- Assets
- Cases
- Campaigns
- Contracts
- Documents
- Opportunities
- Products
- Supported Standard Objects Include:
- Leads
- Contacts
- Solutions
- File Field Count: The Data Import Wizard limits fields to 90.
- Functionality Listed: Data Import Wizard supports insert, update, and upsert but no deletion.
So, before using the Data Import Wizard, check the limitations to ensure it will work for your needs.
How Can Users Get Started With The Data Import Wizard In Salesforce?
Let us walk through the process of getting started with the Data Import Wizard in Salesforce.
- To start with the Data Import Wizard in Salesforce, you must first log into their Salesforce account.
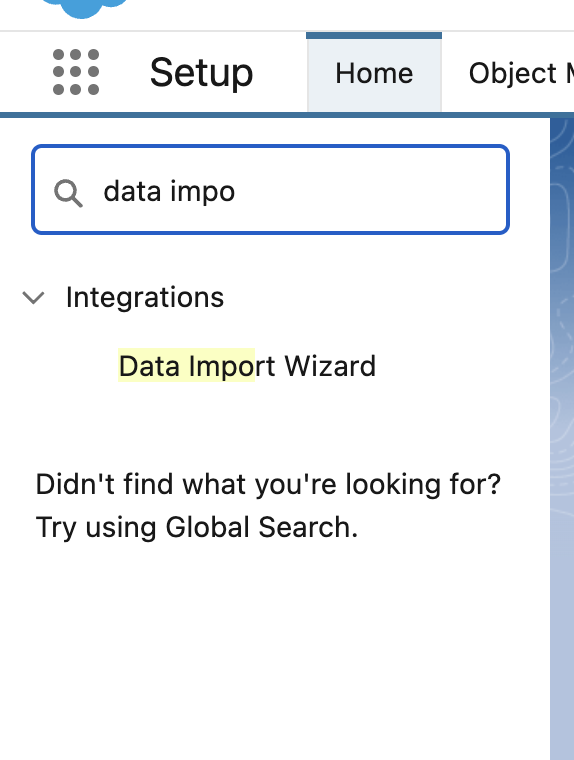
- Once logged in, go to the top right-hand corner of the website and click the “Setup” option.
- Search for Data Import Wizard and open it.
- From there, you can select which object to import data from and choose whether to perform an insert, update, or upsert.
- Once the object and operation have been selected, you must provide a .csv file for the upload. It should be noted that standard excel files are not suitable for these data import operations.
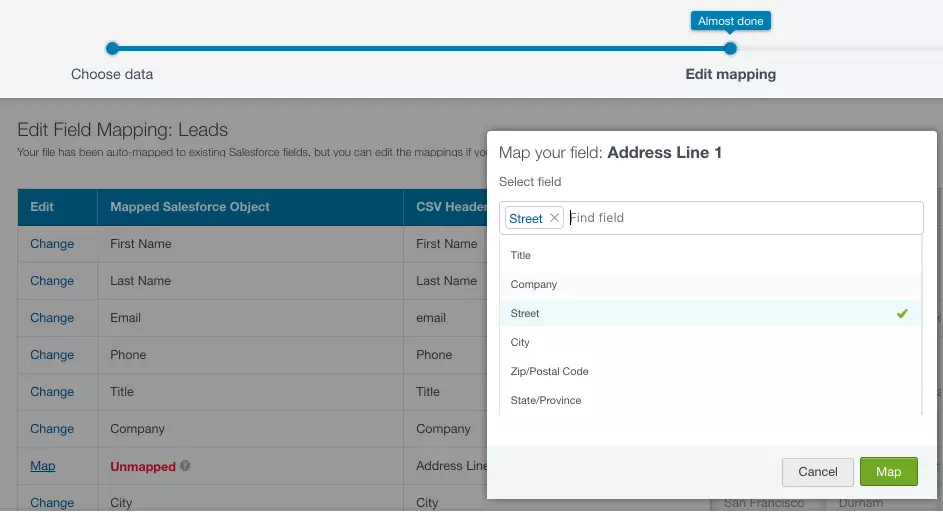
- After the .csv file has been selected, you need to map the fields from your file to the available fields in Salesforce.
- The Data Import Wizard will try to match fields automatically, but users can change any of the mappings completed automatically.
- Any field that Salesforce failed to map would be displayed as “Unmapped” on the screen.
- When you’re done mapping fields, a confirmation screen will show you how many were successfully mapped and how many were not.
- When users initiate the import, they can check its status in the Bulk Data Load Jobs area of Salesforce Setup. This is where users can see the status of their import job and any error messages that occurred during the process. It is essential to fix any errors during the import process before attempting another import, as continuing to import data with errors can result in data loss.
Perks of Using the Data Import Wizard in Salesforce
Let us review the various benefits of using the Data Import Wizard in Salesforce.
1. Time Savings
Salesforce’s Data Import Wizard may save firms a great deal of time when importing data. Users can upload a file containing the data they wish to import instead of manually typing it into Salesforce. This reduces the need for each piece of data to be manually entered, which can be time-consuming.
The Data Import Wizard can also automate some tasks, such as adding new records or modifying existing ones. Businesses can save even more time by eliminating the need to complete these processes manually.
2. Reduced Errors
Another benefit of using Salesforce’s Data Import Wizard is that it can help to reduce errors. Data entry errors can be costly for businesses, leading to inaccurate reports and decisions based on incorrect information.
With the help of the Data Import Wizard, companies can rest easy knowing that their data is complete and up-to-date. As a result, firms can make better-informed decisions and cut down on unnecessary expenses.
3. Improved Data Accuracy
Not only can the Data Import Wizard help to reduce errors, but it can also improve the overall accuracy of data. This is because businesses can select the fields that they want to import. This signifies that only necessary data is imported, which can significantly reduce the possibility of errors.
The Data Import Wizard can modify previously imported data as an added bonus. This ensures that a company’s Salesforce data is always updated and accurate.
4. Automation
One of the key benefits of the Data Import Wizard is that it can automate many of the tasks associated with data entry. This includes adding new records and updating existing ones with new information. This can save businesses time, as they no longer need to complete these tasks manually.
Additionally, users can use the Data Import Wizard to automate specific processes, such as sending emails or creating reports. This can help businesses streamline their processes and improve efficiency.
Tips for using the Data Import Wizard in Salesforce
1. Choose Your Data Source
The first step is to select the type of data you’re importing, such as contacts, leads, or accounts.
2. Choose Your Import Method
The next step is to choose how to import your data. The Data Import Wizard supports three methods: import from a CSV file, copy and paste data from somewhere else, or enter data directly into Salesforce.
3. Choose Your Field mapping
The next step is to choose which fields from your data source you want to import into Salesforce and which Salesforce fields you want to import them into. This is where you can customize your import to get just the data you want into Salesforce.
4. Start Your Import
The final step is to start your import! The Data Import Wizard will take it from there, and you can track the progress of your import from the Jobs page.
Following these simple tips, you can easily import your data into Salesforce using the Data Import Wizard.
Summing Up
Salesforce’s Data Import Wizard is a crucial tool for quickly importing data into Salesforce. It is simple, safe, and efficient, making it ideal for businesses that import big chunks of data into Salesforce. You can save countless hours of manual data entering by familiarizing yourself with the Data Import Wizard. If you need more clarification on this or anything on Salesforce, join the saasguru Slack community and interact with experienced Salesforce professionals.
Frequently Asked Questions (FAQs)
1. What is the difference between a Data Loader and an Import Wizard in Salesforce?
The main difference between the Salesforce Data Import Wizard and Data Loader in Salesforce lies in their complexity and capabilities. The Salesforce Data Import Wizard is a user-friendly tool designed for importing up to 50,000 records at a time. It supports simple operations like insert, update, and upsert and is ideal for less complex data import needs, offering an intuitive interface for mapping fields and validating data. On the other hand, Data Loader is a more powerful tool that can handle up to 5 million records per operation and supports additional operations like delete and hard delete. Data Loader is typically used for more complex data migration tasks and requires a deeper understanding of Salesforce objects and data structures.
2. What are the limitations of the Data Import Wizard?
The limitations of the Salesforce Data Import Wizard include a maximum file size of 100 MB (or 32 MB for zipped files) and a limit of 50,000 records per import. Additionally, it supports a limited number of Salesforce objects and cannot perform delete operations. Another limitation is that the Salesforce Data Import Wizard only allows a maximum of 90 fields per file for import. These constraints make the tool more suitable for smaller and less complex data import tasks compared to more robust tools like Data Loader.
3. How do I access the Data Import Wizard in Salesforce?
To access the Salesforce Data Import Wizard, log into your Salesforce account and navigate to the Setup menu. In the Quick Find box, type “Data Import Wizard” and select it from the options. This will take you to the Salesforce Data Import Wizard interface, where you can choose the object you want to import data into, and proceed with the data import process, including file upload, field mapping, and initiating the import operation. The user-friendly interface of the Salesforce Data Import Wizard makes it easy to navigate and use, even for those with limited technical expertise.
 Bootcamps
 Mock Exams
 Hands-on Labs


